

How To Repair A Blown Out Light In Photoshop

Perspective Correction In Photoshop – Repairing Keystoning
Have yous always tried taking a photo of a building just to have the building look like it's leaning backwards? That's a perspective problem known equally keystoning, and it'due south caused by the building and the photographic camera lens existence on two different angles.
Ordinarily, unless y'all're fond of climbing copse or you lot accept a friend at the fire section, standing on the ground and tilting the camera back a bit is the only way to get the tiptop of a tall edifice into the photograph, and since the photographic camera is tilted away from the building when you lot snap the image, with the top of the lens being further away from it than the bottom of the lens, the edifice ends upwards looking like its leaning backwards. This problem actually exists whatsoever fourth dimension you need to tilt the camera back to go something tall into the photo but it's near noticeable with buildings due to their straight parallel sides.
Keystoning tin sometimes be a desirable consequence since it can add a real sense of drama to the paradigm. Even so, at that place are times when you'll wish there was some way to correct this perspective problem, and Photoshop gives the states a few unlike ways to get near it. Upwards until recently, nosotros had a choice of using either the Crop Tool or the Gratis Transform command, but in Photoshop CS2, Adobe introduced the powerful Lens Correction filter which quickly replaced those other two methods as the fastest and easiest mode to correct keystoning. We'll wait at how to utilise the Lens Correction filter in this tutorial. I'll be using Photoshop CS4 here, but any version of Photoshop from CS2 on upwardly will piece of work.
Here'south the photo I'll be using. Discover how the building appears to be leaning backwards with the sides tilted inward rather than being parallel to each other equally they should be:
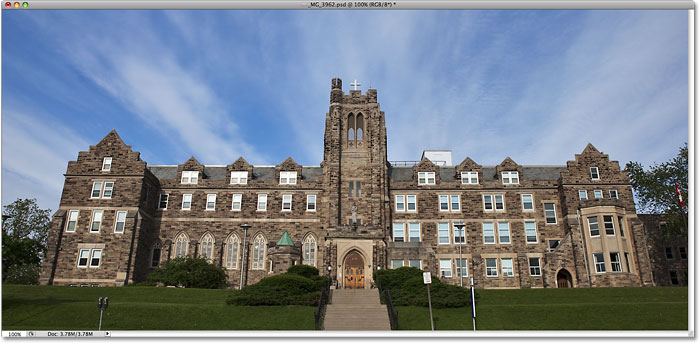
The original image with the building appearing to lean backwards.
Here'southward how information technology volition await when we're done:
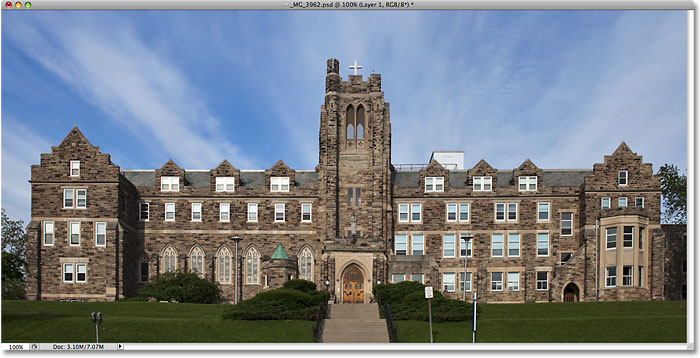
The concluding result.
Let's go started!
Shortcodes, Actions and Filters Plugin: Mistake in shortcode [ads-photoretouch-middle_2]
Step 1: Duplicate The Background Layer
Before we practice annihilation else, we should get-go make a copy of the original epitome which is sitting on the Groundwork layer in the Layers palette. This is to avoid doing whatever damage to the original in case we demand information technology after. To duplicate the Background layer, get up to the Layer carte at the elevation of the screen, choose New so cull Layer via Copy. Or, to salve time, only use the handy keyboard shortcut Ctrl+J (Win) / Command+J (Mac). Either way tells Photoshop to make a copy of the Background layer for u.s., and if nosotros look in the Layers palette, nosotros can see that we now have two layers. The original Background layer is on the lesser, and a copy of the layer, which Photoshop automatically named "Layer ane", is sitting directly higher up it:

Duplicate the Background layer to avert dissentious the original image.
Step 2: Open The Lens Correction Filter
Now that we're working on a re-create of the paradigm, let's bring upwards the Lens Correction filter past going upward to the Filter bill of fare at the top of the screen, choosing Distort and and so choosing Lens Correction:

Get to Filter > Distort > Lens Correction.
Step 3: Straighten The Image If Needed
Photoshop's large Lens Correction dialog box appears, with a few tools along the left, a large preview expanse in the eye and several options for correcting lens bug forth the right. Earlier we fix our keystoning trouble, we should take care of a couple of other potential problems first which will the brand information technology easier for usa to gear up the keystoning. To starting time with, let's make sure the image is straight. Nosotros tin do that using the Straighten Tool, which is the second tool from the top on the left side of the dialog box. Click on it to select it. So simply click and drag across something in the image that should exist straight, either horizontally or vertically. I'yard going to click across the roof on the left side of the building in my photograph. When you release your mouse button, Photoshop will rotate the image inside the preview area to straighten it (assuming it was kleptomaniacal). If you observe that the filigree is making it difficult to see what you're doing, you can turn it off temporarily by unchecking the Testify Grid choice at the bottom of the dialog box:

Click and elevate with the Straighten Tool across something in the image that should exist straight.
If you lot need to zoom in on the image, printing Ctrl++ (Win) / Command++ (Mac), or to zoom out, printing Ctrl+- (Win) / Command+- (Mac). If, while zoomed in, you lot need to movement the epitome around inside the preview area, simply hold down your spacebar which gives you temporary access to the Hand Tool, then click and drag the image to motility it.
Stride iv: Gear up Whatsoever Barrel Or Pincushion Distortion
Sometimes a photo can suffer from what's called barrel baloney where the image appears to burl out from its center as if it's being wrapped around a sphere, or from pincushion distortion, the exact reverse problem where it appears to be pinched in towards the center. Not all images accept one of these problems but if yours does, it's best to correct it before attempting to fix the keystoning. At that place'due south a couple of different means to do this. Ane is to click on the Remove Baloney Tool, which is the top tool on the left of the dialog box, then simply click and elevate within the image with your mouse. Drag towards the center of the paradigm to correct any barrel distortion, or drag abroad from the center to correct whatsoever pincushioning:

Click on the Remove Distortion Tool, then click and elevate inside the prototype to remove barrelling or pincushioning if needed.
You can accomplish the same thing with the Remove Distortion slider at the top of the column on the correct. Drag the slider towards the left to correct pincushioning, or drag it to the correct to correct barrelling. Regardless of the method yous choose, make sure you don't drag too far otherwise yous'll end up causing the opposite trouble that you're correcting. You lot'll probably detect the filigree helpful when trying to gear up these problems, and then check the Bear witness Grid option at the lesser of the dialog box to turn information technology back on if y'all turned it off in the previous pace:

Elevate the Remove Distortion slider towards the left to correct pincushioning or the right to correct barrelling.
If y'all've gone too far and need to reset the prototype, simply enter value of 0 into the Remove Distortion input box directly above the slider.
Now that nosotros've made sure the image is directly and we've removed any baloney, let's set up our keystoning problem. We'll do that adjacent!
Step 5: Drag The Vertical Perspective Slider To Correct The Keystoning
Near the bottom of the column on the right of the Lens Correction dialog box is an option called Vertical Perspective, and all we need to do to right our keystoning problem is drag the Vertical Perspective slider either left or correct. For images where the building looks like it's leaning backwards, you lot'll desire to drag the slider towards the left. Equally yous practice, you'll see the image in the preview expanse appear to tilt forrad. The further you drag the slider, the more the image will tilt and as it does, the sides of the edifice will announced to straighten themselves out. Go on an eye on the sides of the edifice as you drag the slider and compare them with the vertical lines in the grid. When the grid lines and the building sides appear parallel to each other, you've corrected the keystoning:

Compare the building sides with the vertical grid lines as you elevate the Vertical Perspective slider. Stop when the grid lines and the sides announced parallel.
If yous demand to move the grid around to line it upwardly with i of the sides of the building, select the Move Filigree Tool straight below the Straighten Tool on the left of the dialog box, so click and drag within the preview expanse to motion the filigree equally needed.

Move the filigree around inside the preview area if needed with the Motility Filigree Tool.
Pace 6: Set The Edge Option To Either Transparency Or Background Color
By tilting the image forrad, we've created a lot of bare space forth the bottom of the epitome. We need to tell Photoshop how we desire to bargain with that bare space, and nosotros do that using the Border option at the bottom of the right column, below the Vertical Perspective slider. Past default, the Edge choice is set to Transparency, which fills the bare area with a filigree pattern (which is how Photoshop displays transparency). Y'all can get out it fix to Transparency if you like or yous can select Background Color, which fills the blank area with your current background color. There'due south also a 3rd option, Border Extension, which I highly recommend you don't employ. Personally, I prefer to select Background Color considering it makes it easier to meet where the image needs to be cropped, which we'll exist doing in a moment:
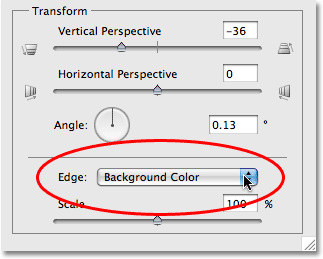
Cull either "Transparency" or "Background Colour" for the Edge choice.
Click OK in the top right corner of the dialog box when yous're done to exit out of information technology and Photoshop applies your adjustments to the image. Here's my photograph after correcting the keystoning. The sides of the building are now parallel and it no longer looks like its leaning backwards. Notice that the blank area forth the lesser has been filled with black which is my current groundwork color. If you set your Edge option to Transparency, you'll run across the lesser of the original image on the Background layer showing through:

The sides of the building now announced parallel.
Step 7: Employ The Free Transform Command If Needed
You lot may notice at this point that the building looks a little short and stubby. In other words, information technology doesn't seem quite as tall every bit it should exist. If that's the case, press Ctrl+T (Win) / Command+T (Mac) on your keyboard to quickly bring up the Free Transform box and handles around the image. Printing the letter F to switch to Full Screen manner if yous're currently working in a document window so you lot tin meet what you're doing, and so click on the bottom handle and drag it downwards a short means to stretch the image vertically until the building looks the mode information technology should. Press Enter (Win) / Return (Mac) when you're done to accept the change:

Elevate the bottom Free Transform handle downwardly to stretch the image vertically if needed, making the building appear taller.
Step viii: Ingather The Image
As a concluding pace, we need to crop away all the unwanted areas along the bottom and the sides. For that, we'll use Photoshop's Ingather Tool. Select it from the Tools palette or simply printing the letter C on your keyboard to select information technology with the shortcut:

Select the Ingather Tool.
And so, with the Crop Tool selected, click and drag out a cropping border. Everything inside the edge will exist kept while everything outside of it volition be cropped abroad. Once you have an initial cropping edge, utilise the handles on the meridian, lesser, sides or corners to fine-tune it until you've selected the surface area you want to keep:

Drag a cropping border around the surface area you lot want to keep.
Before you crop the prototype, get up to the Options Bar at the elevation of the screen and select the Hide option. This way, rather than deleting the expanse that gets cropped away, Photoshop will simply hide it, assuasive you to undo the ingather afterwards and restore the unabridged prototype if you ever demand to go back to the PSD file to access the original image on the Background layer (to restore the epitome after cropping information technology, go up to the Image bill of fare and choose Reveal All):
Select Hide in the Options Bar to hibernate the cropped area rather than delete it.
Press Enter (Win) / Return (Mac) to crop the paradigm, and you're done! Here's the original photo again for comparison:
The original paradigm over again.
And here, after straightening the photograph, repairing whatsoever barrel or pincushion distortion and fixing the keystoning problem, all inside Photoshop'southward Lens Correction dialog box, is my last result:
The final result.
And there we have it! That's how to correct perspective problems in an epitome using the Lens Correction filter in Photoshop! Cheque out our Photo Retouching section for more Photoshop paradigm editing tutorials!
Other Stuff
© 2022 Photoshop Essentials.com.
For inspiration, not duplication.
Site design past Steve Patterson.
Photoshop is a trademark of Adobe Systems Inc.

Source: https://www.photoshopessentials.com/photo-editing/keystoning/
Posted by: harderruiter73.blogspot.com
0 Response to "How To Repair A Blown Out Light In Photoshop"
Post a Comment